When we moved into our home, we didn’t have a true entryway.
Like many homes without a dedicated mudroom or foyer, we started with a narrow entry table that had two small drawers. While it looked nice, it quickly became obvious that it wasn’t meeting our family’s needs.
The drawers didn’t hold much, and the limited storage meant everyday items were constantly left out in the open. Backpacks, diaper bags, keys, wallets, sunglasses, and mail all ended up visible right when you walked into our home. No matter how often we tidied up, the area always felt cluttered because there simply wasn’t a place to put everything.
I wanted a solution that would provide real storage while still fitting seamlessly into our home. Because the space is part of our open floor plan, whatever we added needed to be functional without feeling bulky or overwhelming.
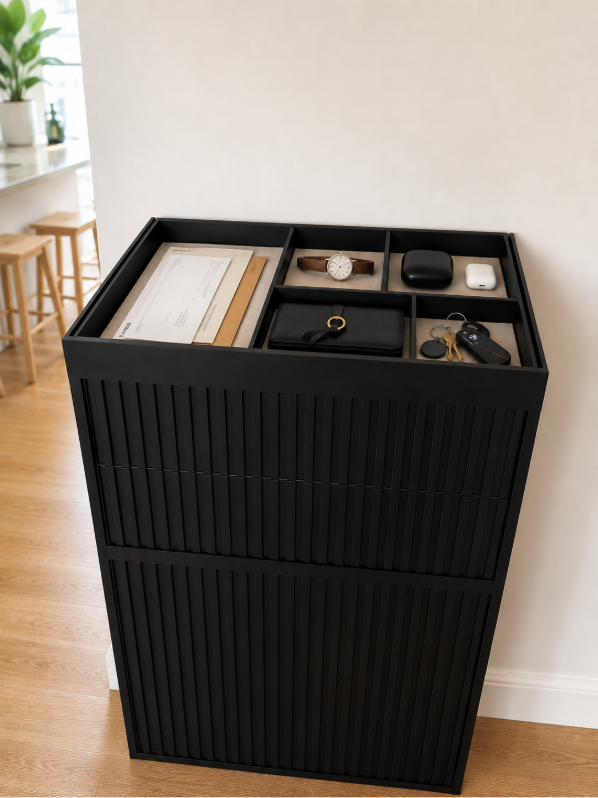
Instead of investing in expensive custom built-ins, I started with a combination of IKEA cabinets and transformed them into a custom entryway drop zone. By adding fluted detailing, wood trim, and a divided organizer tray on top, I was able to create a piece that looks custom built while concealing the everyday items that previously created visual clutter.
Now, backpacks, bags, chargers, sunglasses, keys, and other essentials have a designated place, while the divided tray keeps smaller items organized and easy to grab on the way out the door. The result is an entryway that feels intentional, organized, and much better suited to how our family actually lives. If you’re looking for entryway storage ideas, mudroom alternatives, or IKEA hacks for small spaces, this DIY project may be the perfect solution.

The Entryway We Started With
When we first moved into our home, we tried to create an entryway using a simple console table.
At first, it seemed like enough. The drawers provided a place for a few small items, and the open shelf underneath gave us somewhere to set bags when we came home.
But as our family grew, so did the amount of stuff that naturally collects near the front door.

The problem wasn’t that the table was unattractive—it simply wasn’t designed for how we actually lived.
Mail piled up on the surface.
Keys, sunglasses, and everyday essentials were constantly being moved around.
The small drawers quickly filled up.
And because the lower shelf was completely open, backpacks and diaper bags were always visible.
No matter how often we cleaned it, the area felt cluttered because there wasn’t enough storage to support our daily routines.
What we really needed wasn’t another decorative table.
We needed a functional drop zone that could:
- Hide visual clutter
- Store backpacks and bags
- Keep everyday essentials easy to find
- Fit within our narrow space
- Blend seamlessly with the rest of our home
That realization is what led me to create this custom IKEA entryway drop zone.
Why We Needed a Better Entryway Solution
The challenge wasn’t simply adding storage.
We needed a piece that would:
- Create a functional drop zone where none existed
- Hide visual clutter
- Provide storage for larger items
- Work in a narrow space
- Fit with the aesthetic of our home
- Feel intentional rather than temporary
Custom built-ins would have cost significantly more, so I started looking for an affordable alternative that I could customize myself.
Project Cost
| Item | Cost |
| IKEA EKET Cabinet with Doors | $90 |
| IKEA EKET Cabinet with Drawers | $110 |
| Poplar Trim | $100 |
| Paint & Primer | $43 |
| Wood Glue | $7 |
| Brad Nails | $5 |
| Miscellaneous Supplies | $25 |
| Total Project Cost | $380 |
Some links in this post are affiliate links. If you make a purchase, I may earn a small commission at no additional cost to you. I only share products I personally use, love, or would recommend to family and friends. Read my full disclosure policy here.
Materials Used
IKEA Foundation Pieces
- IKEA EKET Cabinet with 2 Doors Shop IKEA EKET here
- IKEA EKET Cabinet with 2 Drawers Shop IKEA EKET here
Additional Materials
- Poplar trim boards
- Trim – ¼” x 2”x 4’ Poplar Boards and ¼”x4”x 4’ Poplar Boards
- Wood glue Shop Wood Glue here
- Brad nails Shop Brad Nails here
- Primer Shop Primer here
- Paint – Sherwin Williams Tricorn Black
- Miter saw Shop Miter Saw here
- Nail gun Shop Nail Gun here
DIY Entryway Drop Zone Tutorial
Step 1: Assemble the IKEA Cabinets
The foundation of this project started with two IKEA EKET units.
I chose these cabinets because they are only 13¾ inches deep, making them ideal for smaller spaces where every inch matters.
The combination of drawers and enclosed cabinet storage gave us flexibility while maintaining a slim footprint.

Step 2: Plan the Fluted Design
Once the cabinets were assembled, I measured the fronts and planned the fluted detailing.
I wanted the finished piece to feel custom and elevated while still being simple enough to build myself.
The fluted trim instantly transformed the flat cabinet fronts into something that looked much more expensive.

Step 3: Install the Fluted Trim
Using wood glue and brad nails, I attached each trim piece to the cabinet fronts.
This step took patience because consistent spacing makes a huge difference in the final look.
As the trim went on, the cabinets immediately started looking less like IKEA furniture and more like a custom piece.

Step 4: Build the Organizer Tray
One of my favorite features is the divided organizer tray on top.
Our old entry table had nowhere to contain the small items that seem to collect near the front door.
The tray creates designated spaces for:
- Keys
- Wallets
- Sunglasses
- Hair accessories
- Other daily essentials
Having designated compartments makes it much easier to keep the surface looking tidy.

Step 5: Prime and Paint
After all of the trim was installed, I filled nail holes, sanded the surfaces, primed everything, and applied paint.
This step is what truly unified the project and made the cabinets feel like one custom-built piece.

Step 6: Create a Hidden Charging Drawer
One unexpected benefit of this project was the location.
The original entry table sat directly in front of an electrical outlet, which gave me the opportunity to create a hidden charging station inside one of the drawers.
Instead of having charging cords scattered throughout the house, we now have a dedicated space where phones, earbuds, tablets, and other devices can charge out of sight.
The drawer keeps everything organized while still being easily accessible.
It’s one of the features we use every single day.
Because the cabinet sits directly in front of the outlet, the cords remain completely hidden. Phones, earbuds, and portable devices can charge out of sight while keeping countertops and kitchen surfaces free of clutter.

Step 7: Organize and Style
Once finished, I loaded the drawers and cabinets with the items that had previously been creating clutter.
Now we can store:
- Sunglasses
- Backpacks
- Diaper bags
- Purses
- Wallets
- Chargers
- Miscellaneous everyday items
What used to sit in plain sight is now hidden behind closed doors, making the entire entryway feel calmer and less cluttered.
Everything finally has a home.


What Changed After Completing This Project
The biggest difference wasn’t the appearance.
It was the functionality.
Instead of walking into visible clutter every day, we now have a dedicated space designed around how our family actually lives.
The drop zone keeps everyday essentials organized, hidden, and easy to access.
Most importantly, it created an entryway where one didn’t previously exist.
Final Thoughts
If your home lacks a mudroom or traditional foyer, creating a functional drop zone can make a huge difference.
This IKEA hack gave us the custom look we wanted, the storage we needed, and a practical solution for everyday life without the cost of custom cabinetry.
Looking back, this project solved much more than a storage problem. It created an entryway where one didn’t exist, reduced visual clutter, and gave our family a dedicated place for the items we use every day.
If you’re working with a small space, an open floor plan, or a home without a mudroom, this IKEA hack proves that you don’t need expensive custom cabinetry to create a functional drop zone.

If you enjoy functional DIY projects and home organization ideas, you may also like:
Frequently Asked Questions
How much did this IKEA entryway hack cost?
The total cost was approximately $380 including cabinets, trim, paint, and supplies.
Can this work in a small entryway?
Yes. The EKET cabinets are only 13¾ inches deep, making them ideal for narrow spaces.
What paint color did you use?
Sherwin-Williams Tricorn Black.
What do you store inside the cabinet?
We use ours for backpacks, diaper bags, chargers, sunglasses, keys, wallets, and other everyday items.
Can this be customized?
Absolutely. You can adjust the paint color, trim style, and organizer tray layout to fit your home and storage needs.
Love,
Pepper